


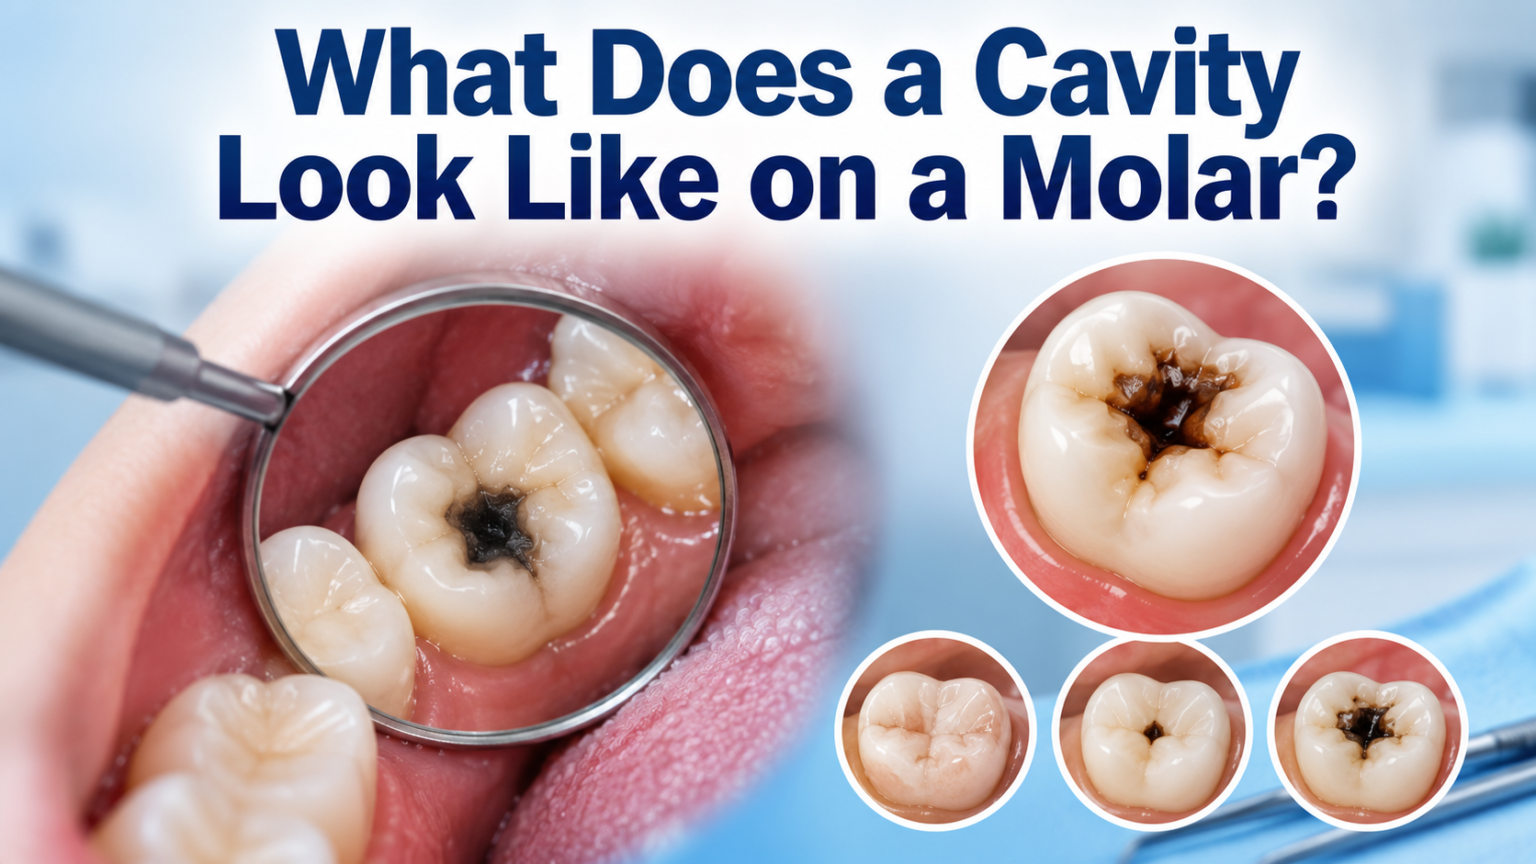
A cavity on a molar usually shows up as a small dark spot inside the natural grooves of the tooth, ranging in color from light brown to black. In the early stages, it may look like a chalky white patch rather than an actual hole.
As decay spreads deeper, the surface often turns rough, stained, or slightly pitted instead of smooth and shiny like healthy enamel. Between the molars, a cavity may not be visible at all until it has already reached the dentin layer.
Many people first notice sensitivity to hot, cold, or sweet foods before they even see a visible mark. Recognizing what does a cavity look like on a molar early on makes it much easier to treat before the damage becomes severe.
Understanding Cavities on Molars
Molars sit at the back of the mouth and have deep grooves that make them a common target for decay. Before learning to spot the visible signs, it helps to understand why these teeth are affected so often and how the process actually begins.
Why Molars Are Prone to Cavities
Molars have wide, uneven chewing surfaces filled with narrow pits and fissures where food particles and bacteria easily settle. These grooves are harder to clean thoroughly with a regular toothbrush compared to the flatter front teeth. Because of this, plaque builds up faster on molars, giving bacteria more time to produce the acids that wear down enamel.
How Tooth Decay Develops
Decay begins when bacteria in plaque feed on sugars and starches left behind after eating, releasing acid as a byproduct. This acid slowly dissolves the minerals in the enamel, creating microscopic weak spots long before any hole appears. Over time, repeated acid attacks widen these weak spots into the visible pits, stains, or holes associated with a cavity.
Early Signs of a Cavity on a Molar
Before a cavity becomes an obvious hole, it usually passes through a few early warning signs. Catching these changes early can prevent the need for more invasive treatment later.
White or Chalky Spots
One of the first visible changes is a dull, white, or chalky patch on the tooth surface, which signals mineral loss in the enamel. Unlike healthy enamel, this spot lacks the natural shine and can look almost powdery up close. At this stage, the damage may still be reversible with proper care.
Slight Discoloration in the Grooves
As decay progresses slightly, the white spot often darkens into a light brown or yellowish stain settled inside the grooves of the molar. This discoloration tends to be more noticeable after eating dark-colored foods or drinks. It is usually a sign that the enamel has started to break down beneath the surface.
Rough or Sticky Texture When Brushing
A healthy tooth surface feels smooth under the tongue or toothbrush, while a developing cavity often feels slightly rough or sticky. This texture change happens because the enamel surface is no longer even, and food or plaque tends to cling to the damaged area. Many people notice this texture shift even before they see a clear visual mark.
What a Cavity Looks Like at Different Stages
A cavity does not appear the same way from start to finish; its look changes significantly as decay advances. The table below breaks down what to expect at each stage.
Stage 1 – Initial Demineralization
At this earliest stage, the molar shows a faint white or chalky spot without any visible hole or texture change. There is usually no pain at all, which makes this stage easy to miss without a dental checkup. This is also the stage where remineralization treatments work best.
Stage 2 – Enamel Decay
The white spot progresses into a light brown or yellow-tinted mark as the enamel continues to weaken. The surface may start feeling slightly rough, though a clear hole is still not present. Mild sensitivity to sweet or cold foods can begin around this point.
Stage 3 – Dentin Decay
Once decay reaches the dentin layer beneath the enamel, a small pit or shallow hole becomes visible, often darker in color. The tooth may look more clearly damaged, and sensitivity tends to increase noticeably. This stage usually requires a filling to stop further progression.
Stage 4 – Pulp Involvement
At this point, the cavity looks like a larger, darker hole, sometimes with a soft or crumbly edge around it. Pain often becomes more constant rather than triggered only by hot or cold foods. Treatment at this stage is more involved, often requiring root canal therapy.
Stage 5 – Abscess Formation
In severe, untreated cases, the area around the molar may appear swollen, with a dark, deeply broken-down tooth structure. There may also be visible swelling of the gum or face, along with persistent throbbing pain. This stage needs urgent dental attention to prevent further complications.
| Stage | Appearance | Common Symptoms | Urgency Level |
| Stage 1 | Faint white or chalky spot | None | Low – monitor |
| Stage 2 | Light brown or yellow mark | Mild sensitivity | Low-Moderate |
| Stage 3 | Small dark pit or hole | Noticeable sensitivity | Moderate – treat soon |
| Stage 4 | Larger dark hole, soft edges | Frequent or constant pain | High – needs treatment |
| Stage 5 | Broken tooth, swelling nearby | Throbbing pain, swelling | Urgent |
Common Colors and Textures of Molar Cavities
Cavities are not always one uniform color, and recognizing the different shades and textures can help identify decay sooner. Below is a closer look at the most common appearances.
Black or Dark Brown Spots
Darker spots usually indicate decay that has been present for a longer period, as the exposed dentin stains over time. These spots are typically found in the deeper grooves of the molar where cleaning is difficult. A dark spot does not always mean severe pain, but it does mean the decay needs professional evaluation.
Gray or White Discoloration
A grayish tint can sometimes appear when decay develops beneath the enamel surface without breaking through immediately. White discoloration, on the other hand, often signals early demineralization rather than an already-formed hole. Both colors are worth mentioning to a dentist during a routine visit.
Soft or Crumbly Areas
As decay advances, the affected part of the tooth can feel noticeably softer than the surrounding hard enamel. This softness is often accompanied by small crumbling pieces, especially near the edges of a visible hole. A soft spot on a molar is a clear sign that decay has progressed past the earliest stage.
Cavities Between Molars vs. On the Chewing Surface
Where a cavity forms on the molar changes how easily it can be seen. The two most common locations look and behave differently.
Pit and Fissure Cavities
These cavities form directly on the chewing surface, inside the natural grooves and pits of the molar. They are usually easier to spot with a mirror since they sit in plain view. Dark staining or a small pit in this area is a strong indicator of decay.
Interproximal Cavities
These develop between two molars, in the tight space where a toothbrush cannot fully reach. Because they are hidden from direct view, they are often only detected through dental X-rays. By the time they become visible or cause pain, the decay has usually progressed significantly.
Symptoms That Often Accompany a Visible Cavity
A visible mark on a molar is often paired with physical symptoms that confirm decay is present. These signs can help distinguish a true cavity from simple surface staining.
Tooth Sensitivity
Sensitivity to hot, cold, or sweet foods is one of the most common symptoms linked to a visible cavity. It happens as decay wears down enough enamel to expose the more sensitive dentin layer underneath. This sensitivity often becomes more frequent as the cavity deepens.
Pain When Chewing
Pain triggered specifically while chewing or biting down suggests the decay has reached a point where pressure affects the tooth’s inner structure. This kind of pain is usually sharper and more localized to the affected molar. It is a strong signal that a dental visit should not be delayed.
Bad Breath or Bad Taste
Persistent bad breath or a lingering unpleasant taste can occur when food particles and bacteria become trapped inside a cavity. This happens because decayed tissue provides an ideal environment for odor-causing bacteria to thrive. Combined with a visible dark spot, this symptom often confirms active decay.
How to Check for a Cavity at Home
While a home check cannot replace a professional exam, there are simple ways to look for early warning signs on your own. Good lighting and a mirror go a long way.
Visual Self-Check Tips
Use a bright light and a small mirror to examine the chewing surfaces of the back molars, looking closely at the grooves for dark spots or stains. Running a clean finger or the tip of the tongue over the tooth can help detect rough or uneven texture. Comparing one molar to its matching tooth on the other side can also reveal noticeable differences.
When a Mirror Isn’t Enough
Cavities that form between teeth or below the gumline are often impossible to spot through a simple visual check. Persistent sensitivity or pain without any visible mark can still indicate hidden decay. In these cases, only a dental X-ray can confirm what is actually happening beneath the surface.
When to See a Dentist
A dental visit should not be delayed once a dark spot, rough texture, or ongoing sensitivity is noticed on a molar, since early treatment is far simpler than addressing advanced decay. Certain signs call for more urgent attention, including a visible hole with pain that lingers after eating, swelling near the jaw or gum, or a sudden increase in sensitivity to temperature. Persistent bad breath paired with visible staining is another sign worth mentioning to a dentist promptly. Waiting too long often turns a simple filling into a more complex and costly procedure.
How Dentists Diagnose Molar Cavities?
Professional diagnosis goes beyond what can be seen with the naked eye. Dentists rely on a combination of physical examination and imaging to confirm decay.
Visual and Tactile Examination
During a routine checkup, a dentist closely examines each molar under bright light, checking the grooves and edges for discoloration or softness. A small dental instrument is often used to gently probe suspicious areas and check for stickiness or give. This hands-on check can catch cavities that are difficult to see with the eyes alone.
X-rays and Their Role
Dental X-rays reveal decay hidden between teeth or beneath the surface that a visual exam cannot detect. They also show how deep a cavity has progressed, which helps determine the right treatment approach. Regular X-rays are especially important for molars since so much of their surface is hard to inspect directly.
Can a Cavity Heal on Its Own?
Very early stage decay, limited to the white or chalky spot phase, can sometimes be reversed through remineralization using fluoride and improved oral hygiene.
Once the enamel has broken down into an actual pit or hole, however, the damage cannot repair itself and requires professional treatment. Waiting in hopes that a visible cavity will heal on its own usually allows the decay to spread further into the tooth.
Treatment Options Based on Severity
Treatment for a molar cavity depends heavily on how far the decay has progressed by the time it is diagnosed. The table below outlines common approaches matched to different stages of decay.
| Treatment | Best For | What to Expect |
| Fluoride treatment | Early white-spot stage | Non-invasive, strengthens enamel |
| Dental filling | Small to moderate cavities | Removes decay, restores tooth shape |
| Dental crown | Larger cavities with weakened structure | Covers and protects the remaining tooth |
| Root canal | Decay reaching the tooth’s pulp | Removes infected tissue, saves the tooth |
| Extraction | Severely damaged or unsalvageable molar | Removal of tooth, replacement options discussed |
Preventing Future Cavities on Molars
Since molars are naturally more vulnerable to decay, consistent prevention habits make a significant difference over time. A few daily adjustments can protect these teeth long term.
Brushing and Flossing Tips for Back Teeth
Angling the toothbrush slightly to reach the deep grooves of the molars helps remove plaque that flat brushing often misses. Flossing between molars daily clears out trapped food particles before they contribute to decay. Using a soft-bristled brush with gentle, circular motions protects enamel while still cleaning effectively.
Diet and Fluoride
Limiting sugary and starchy snacks reduces the fuel that decay-causing bacteria rely on to produce acid. Drinking fluoridated water and using fluoride toothpaste helps strengthen enamel against everyday acid exposure. Rinsing with water after meals can also reduce the amount of food residue left on molar surfaces.
Regular Dental Checkups
Routine visits allow a dentist to catch early decay long before it becomes visible or painful. Professional cleanings also remove plaque buildup from areas that are difficult to reach at home. Consistent checkups, ideally every six months, make it far easier to treat molar cavities while they are still minor.
Frequently Asked Questions
Can a cavity be invisible?
Yes, especially between molars or below the gumline, where decay can develop without any visible surface change until it is caught on an X-ray.
Is a black spot always a cavity?
Not always, since some stains come from food or minerals, but a black spot on a molar should still be checked by a dentist to rule out decay.
Does a cavity always hurt?
No, early-stage cavities are often painless, which is why visual changes and dentist checkups matter more than waiting for pain.
How fast do molar cavities grow?
The speed varies by person, but decay can progress from a small spot to a deeper cavity within several months if left untreated.
Can you feel a cavity with your tongue?
Yes, a cavity often feels rough, sticky, or slightly indented compared to the smooth surface of healthy enamel nearby.
Conclusion
Knowing what does a cavity look like on a molar, from a faint white spot to a visible dark hole, makes it much easier to catch decay before it becomes painful or costly to treat.
Paying attention to color changes, texture shifts, and sensitivity, along with regular dental checkups, remains the most reliable way to protect molars over time. Early action almost always leads to simpler, less invasive treatment.
Related Posts
Do Psychiatrists Do Therapy? A Complete Guide to What They Actually Offer
Careers in Dental Public Health: Education, Jobs, Salary, and Future Opportunities
Can Jaw Pain Be Caused by an Ear Infection? Full Guide & Relief Tips
Car Accident Back Pain: Causes, Symptoms, and Treatment Options